
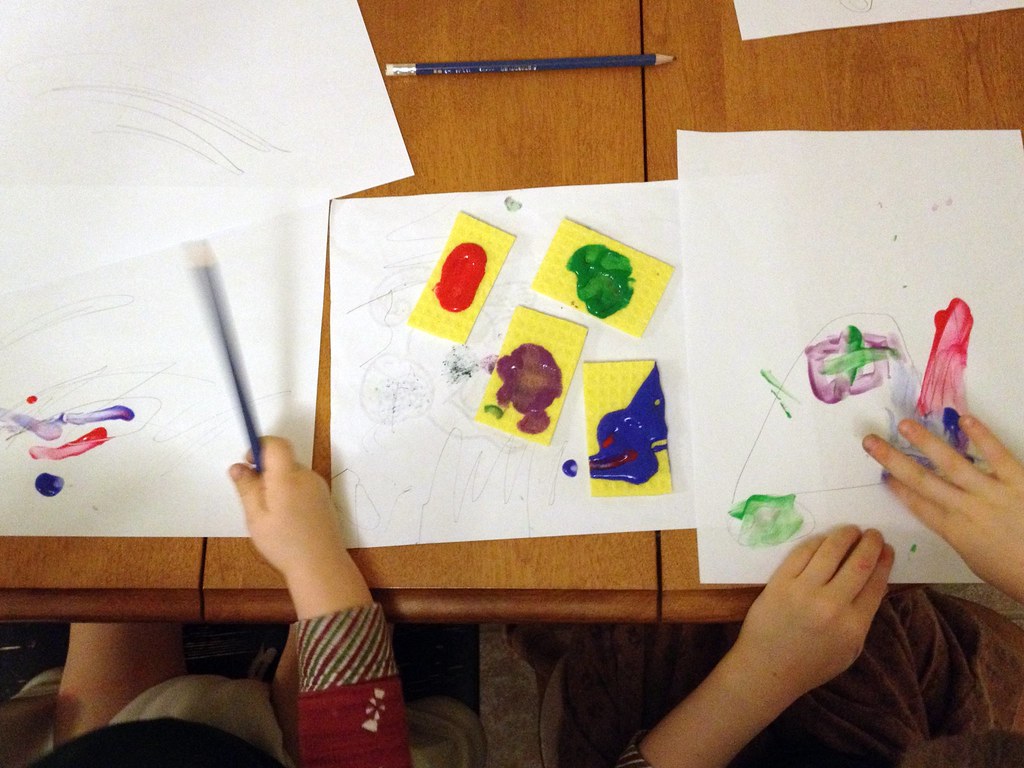
I squirted two primary colours into each of the three Ziplock freezer bags, put a white piece of paper under them, and taped the whole thing down with painter's tape. Then I let the eager boys have at it!

They first experimented with each bag to see what new colour was made when mixing the two primary colours together. Then they drew pictures, made handprints, and drove their cars over the paint to see the tire tracks. Turns out cars aren't exactly gentle on the bags. After a couple quick repairs with masking tape, the cars were parked for the rest of the activity.

Next time I will make sure I get all of the extra air out of the bags before taping them down. A couple of the bags had air bubbles in them, which were much harder to remove once the paint was spread throughout the bag. Painting worked much better with the air bubbles removed.

We kept the bags taped to the table all week, removing them only when we had company coming for dinner. Now I have them tucked away, ready to be brought out and reused again at a later time. In the meantime, good old fashioned finger painting is still a very popular way to pass an afternoon!

I freak about the mess of finger painting & trying to get my LO clean before she can paint anything extra around the house. THIS is brilliant! Thank you!
ReplyDeleteSo glad you found it useful!
DeleteI have a small daycare in my home.and I love this idea. I just need to know, do you put the paper inside the bag?
DeleteI put the paper on the table, underneath the bag. It just provides better contrast for the paint.
Deleteit's good for sometimes when a mess is completely out. Kids should be able to feel the paint on their hands in school without fear of getting hands dirty. Let them experience this without bags at times...like making mudpies, same sensation.Now sand is a whole nother things..outside please. Cornstarch works well inside and cleans up alot easier than sand.
DeleteAnd that is why you can see, Anon, that we also do messy finger painting in the last picture of this post. Both forms are equally valid - and very different! - sensory experiences. Variety is always to be desired when it comes to sensory play, and sometimes mess-free is just a bonus!
DeleteThat's really really cool...Gonna have to do this today while entertaining one more munchie. And thanks for the tip about the cars, I'm sure those would have been busted out over here too.
ReplyDeleteI LOVE this idea! Thanks so much for sharing. Thinking about all the other possible things to put inside. Sand drawing without sand all over the floor anyone? :-)
ReplyDeleteIntriguing idea! I wonder if double-bagging it would be enough to keep the sand from ripping holes in the Ziplocks. It didn't take the car wheels long at all to tear little holes in the bags!
DeleteGlitter bags! I have girls and mixing glitter colors would be HUGE here!
DeleteGlitter! What a fun suggestion!
Deletehow bout glitter MIXED WITH the paint??
Deleteor glitter mixed with clear hair gel.. or colored hair gel for that matter..
DeleteOr glitter glue!
DeleteMaybe you could use Cloud Dough. (Flour and Baby oil)
DeleteYesss
DeleteGlitter, oil, and food coloring, maybe?
DeleteI'm totally Pinter-stalking you now ;-)
ReplyDeleteThanks for sharing this! It's an awesome idea...especially if you have a toddler who thinks splashing is the best thing EVER!
Thanks for linking this up on simple organic! This will be a perfect "while Mama cooks dinner" activity. I love the idea to just leave it on the table for awhile.
ReplyDeleteAn easy way to clean up from traditional finger painting is to allow them to continue to finger paint...with shaving cream. This is even less messier, though...love it! :)
DeleteI've been meaning to try that for a while. Thanks for the reminder!
DeleteJust be careful about adding food coloring to the shaving cream...my mom did that when I was little, and I looked like a blue smurf for a couple of days....
Deletethe shaving cream is WONDERFUL! It is fun for the kids and great for mom. It cleans your table while they play and when you clean up, your table will be super shiny and very clean. Great way to "spruce up" the dining room table. :)
DeleteI've seen a suggestion for finger painting with pudding. At least it's edible (for the littlest ones!). :) I love this idea of no-mess though... and color mixing. Will definitely try it! :)
DeleteShaving cream play in the bathtub is even easier, just turn on the faucet and clean everything(and everyone) at once.
DeleteAn absolutely fantastic idea! We have had so much rain here and only yesterday I purchased some more finger paints! Will def do this tomorrow! Thank you thank you thank you :)
ReplyDeleteDo you have the paper in the bag or under the bag on the table?
ReplyDeleteThe paper is under the bag on the table. It just provides some contrast to make the paint mixing easier to see. :)
DeleteI'm glad u asked this question Stephanie cuz I was a little confused about that and would have totally put the paper in the bad if I didn't know better lol
Deletehave you tried taping the bag to a window or sliding glass door? I did that today. :-)
Deleteim sad my kids just tore it up with their fingernails and ended up with real finger painting, maybe when they are a little older. oh well.
DeleteWhat a great idea!
ReplyDeleteThis is such a great idea! Can't wait to try it with my boys!
ReplyDeleteI'm in...this is perfect for my three year old...
ReplyDeletelove this idea. thank you!! i'm constantly looking for new ways to entertain my toddler in these cold months. i'm blogging about my preschool ideas too, if you're ever interested.
ReplyDeleteThanks so much for sharing your lovely blog!
DeleteI wonder if there is a "thicker" plastic bag that can be used....
ReplyDeleteThe freezer plastic bags are heavier duty.
DeleteYes. Freezer bags r good. I actually just used freezer bags, and have them ready as a surprise for my girls in the morning.
DeleteSweet! Thanks for sharing.
ReplyDeleteI am so going to try this. My daughter will go crazy. Thank you!
ReplyDeleteDid this with my 3 year old. Either i put to much paint or it was too thick. Colors didnt blend well and we couldnt see the white of paper under his finger marks so he pressed harder and harder using his nails. I was affraid he would tear the ziplock bag so we stopped. We tried again and use whipped cream and food coloring just so he can make colors. That was the best part!
ReplyDeleteI'm sorry it didn't work out for you, but your alternative sounds like a lot of fun! Thanks for sharing!
DeleteDefinitely going to have to try this with my two year old... he has a weird phobia of getting things on his hands. He'll play in the dirt and mud, but if he gets peanut butter on his hands, it's the end of the world. This would be perfect for him. Thanks for sharing!
ReplyDeleteWonder if this would work in a preschool setting with 16 sets of busy hands curious about color mixing...What the heck, worth a shot anyway. Great idea! Thanks for sharing!
ReplyDeleteMy preschool kids loved it. I put them in the art center so only 4 at a time and I had 4 bags, although I only did one color in each bag.
DeleteWe do this in a toddler classroom with 10-12 toddlers. we put shaving cream with different colored paints to mix. It works out great. Just be sure to tape the bags to the table so if the bag would break you don't get paint everywhere.
DeleteI am a prek teacher and thought the idea was great! I did this with my preschoolers this week and they loved it. I put it in my art center. I can't wait to try it with my daughter.
ReplyDeleteThis idea is GENIUS! I was painting with my toddler today: the painting bit was massive fun, but the clean-up once she's bored and wants to wander off & do somthing else was immensely stressful ~ trying to get her clean & get all the paint & brushes away before it gets smeared all over the house / eaten by the baby is a race against time. I am absolutely doing this next time instead.
ReplyDeleteI tried this with my kids today and used sandwich size bag and was able to tape 2 of them to a plastic place mat. So we have them all ready to go whenever they want, but I can still put them away.
ReplyDeleteGreat modification, Jess. Thanks for sharing!
DeleteLOVE this idea! I have a 6 year old and a 2 year old, and the 2 year old hates to get messy but loves to paint with her big brother. He LOVES fingerpainting! This could allow her to do the same thing he's doing without the mess! Thank you!
ReplyDeleteI LOVE this idea, and can't wait to try it out with my boys!!!
ReplyDeleteThis is great. Someone mentioned other things, which has me thinking, what about some kind of oil/glitter/small shaped confetti thing? It would be like a disco party in a bag!! I think I will set this up for the kiddos tomorrow and experiment with the other idea by myself, in case it fails, or explodes.
ReplyDeleteThanks again!
That sounds so fun! Let us know how it works out for you!
DeleteThe glitter would be "eaten alive" by the tempera paint, and wouldn't show up as glitter. You would be able, however, to feel the grittiness while "painting" through the bag.
DeleteI teach pre-k and we have done these with hair gel and glitter. They are beautiful. If you use the light blue hair gel it looks like the ocean. We put little fish shaped confetti in it and it was fun. :o)
DeleteThank you for this! My son HATES getting his hands dirty from paint, but I reckon he'll think this is the bee's knees!
ReplyDeleteWhat an AWESOME idea.. we have a link party going on.. will you link this up> I love it!
ReplyDeleteThis is such a great idea! This will ensure more play time because I'll be spending less time on cleaning up the mess.
ReplyDeleteI just saw your idea on another blog. This is a great option for my son, who is the one who doesn't like to fingerpaint. He'd rather just paint his whole body, LOL. I love your profile pic with the babywearing. I miss that stage so much. All my beautiful carriers are stored in the closet!
ReplyDeleteGreat tutorial! I did this with my kids tonight and posted the results on my blog with a link back to you. Please let me know if this is okay. You have a wonderful blog! I made some tweaks to my version - made it portable with a place mat and taped it up just a tad different on the zipper part. Looking forward to reading more of your blog!
ReplyDeleteDefinitely okay! I loved your portable modification. Great way to have it ready to go when needed!
DeleteThis is a wonderful idea! I wonder if you could put the paper inside to make a cool painting?
ReplyDeleteThat would be neat to try!
DeleteSounds like a good idea, but be prepared for both sides of your paper to be painted!!
Deleteyou could fold all four corners to the center. Place the paper in the bag and paint. When you are finished painting, take the paper out of the bag and unfold. The inside should be paint free. Worth a shot to try. :)
DeleteI love this idea! The mess is always what keeps me from doing things like this. Thanks for the inspiration.
ReplyDeletethis activity is also great over a light box!
ReplyDeleteThis is a great idea for times when u want to leave them unsupervised....but I think the kids today are too clean so some real and messy finger painting is still a must!
ReplyDeleteFabulous idea!
ReplyDeleteThis is a unique and creative way of spending our pastime. Thank you for sharing!
ReplyDeleteLifesaver! I have amy son's fifth birthday party this Saturday and we invited some church friends with toddlers. Been wracking my brain for activities for them. This would be awesome! Thanks for the post!
ReplyDeleteWhat a lifesaver! I have toddlers coming to my son's fifth birthday party and this would make a nice activity for them without worrying the parents about getting their kids dirty or the paint being eaten. Super idea!
ReplyDeleteused this to help my third grader with his times tables. we would shake dice and multiply the numbers then he would use his finger to write the answer in the "paint". fun!!
ReplyDeleteAwesome- just did it.
ReplyDeleteMy four and six year old are having a blast with this activity as I type this. Terrific idea. The other day my 4 year old asked if she could finger paint and I reminded her that we only do that in the summer as an outdoor activity. She is so excited! Thank you!!!!!!!!
ReplyDeleteWe're trying this today!
ReplyDeletelove this idea and love Pinterst!
ReplyDeleteI wonder if you could use cookie cutters (plastic) to make fun shapes?
ReplyDeleteI loved this! I did it with my son. I linked up to this on my blog: http://sswoot.blogspot.com/2012/03/5-rainy-day-activities-with-adorable.html
ReplyDeleteThank you for inspiring a fun afternoon!
ReplyDeletehttp://lovethatboy.wordpress.com/2012/04/01/move-over-picasso/
Great idea! I will be trying this week-- my poor DD never gets to finger paint because mama doesn't like the mess! We did mud pies outside and I almost lost it over her flinging MUD everywhere... toddlers!
ReplyDeleteGreat post! I have to try this! After some MESSY mud pies and mud FLINGING this afternoon I'll take anything I don't have to wash off immediately. Oh to be a two-year-old!
ReplyDeleteWe do this in our home but instead of taping the thing to the table, I tape the bag to the paper. I use a bright green backing paper and one contrasting paint inside the bag. You can take it anywhere now (great for car rides!). You can also add a layer of cardboard behind the paper too to add stiffness.
ReplyDeleteBRILLIANT IDEA!!!
ReplyDeleteWow, brilliant idea!!! I'm so doing this with the kids next weekend!
ReplyDeleteJust tried it with my 2 year old daughter she loved it. We also added cookie cutters to move paint around.
ReplyDeleteI don't have paint or shaving cream. Is there a way to do something w cornstarch maybe?
ReplyDeleteI'm going to do a summer craft camp for little kids. (I'm only 11!!!) and this seems like a wonderful idea. are you able to put papaer inside so you can let them take home their masterpiece?
ReplyDeleteI haven't tried it and envision it to be quite the mess trying to get the paper out, but it's always worth a shot!
DeleteI did this for my Sunday school class but I put it on foam board so I can just put it away an reuse another day.
ReplyDeleteThank you for posting this! I used this for one of our craft projects in VBS for the 2-4 year olds. With a little tweeking, we experienced (with little mess I might add:) how God made the river like a wall of water so that the people could cross it. The children loved moving the "water" back and forth:)
ReplyDeleteI'm going to add this for my twins for their texture therapy during occupational therapy time
ReplyDeleteMaybe I'll stick ours on the wall when not wanted on the table!
ReplyDeleteFor those of you looking to make a record of the art work you can cut the bag so you can fold it open when finished then tape it up tightly you can open it up and lay paper over it to make a print. Another option is digital photography that way you can record more than one creation with the same materials. Then you can print onto plain/coloured/textured/photo paper or display on a digital photo frame this has the added benifit of being able to display lots of creations without them becoming floor to ceiling wallpaper.
ReplyDeleteWow ! Thank you so much for the inspiration you have provided me with! I sat down and did this with my 20 month old this morning and she LOVED it. We started out with just one colour as I wanted to use it as an intro to the colour red. We then looked at the marks that different red object made on the paint board such as a red car, red fork, red block etc
ReplyDeleteBrilliant. I will use this idea again and again. I have posted about it on my blog and referenced your site. Here's a link if you're interested ://non-nativebilingualadventure.blogspot.co.uk/2012/06/sensory-play.html
Thanks again
What a great idea! This is perfect for a preschool/toddler activity while mom is busy teaching the older kids (we homeschool), and I love. That it can be left out for a while. Thanks for posting this!
ReplyDeleteAh-freaking-mazing!!! My girls have taken a liking to finger painting...me, not so much. It creates this huge mess! It cleans up easily, but this would be soooo much better for my OCD ;) Great idea!
ReplyDeleteOkay. So maybe I am just tired. But you out the paper down on the table. Put paint inside ziplock bags but don't seal them and then tape everything down and allow them to press in the bags to make secondary colors? What is overtop? Syran wrap?
ReplyDeleteThe paper on the table is just for contrast underneath the bags. Put paint inside ziplock bags, seal the bags, tape it to the table. They push the paint around with their fingers to mix the colours and make pictures. Nothing overtop. Hope that clears things up for you.
DeleteSo was the white paper UNDER the bags or inside the bags with the paint?
ReplyDeleteUnder, just for contrast against our dark table.
DeleteGreat idea. Want to use this as an alphabet or name practice station in September with my Kindergarteners. This will be much easier to manage as I don't have an aide in the classroom. The kids will have fun with the paint and I won't have all the stress of the clean up. I also liked the suggestion someone made of having it on plastic placemats so the set up will be easy as well.
ReplyDeleteyou could tape it to a clip board or something and bring it in the car for long car rides
ReplyDeleteif you did that i would use ducktape
Deletewhat kind of paint did you use or does it matter?
ReplyDeleteI used some generic tempera paint that I had on hand.
DeleteAt first I thought you put the paper on the table, then a few pools of paint then covered it with clear plastic and taped it off.. I may try your way and what I was thinking. I love the mess free!!! BUT if the paint was able to smoosh around on the paper, then they would have an art work after you peeled off the plastic of course!
ReplyDeleteawesome, my daughter hates finger painting anything messy freaks her out this will be perfect!
ReplyDeleteSuch a good idea !! Thanks for sharing.
ReplyDeleteWill definitely try it soon :)
Did this with my oldest today. She got bored after a few minutes but keeps going back and forth today. Linked to this since I found it here a few weeks ago.
ReplyDeletehttp://mommymadness711.blogspot.com
I love this!! My kids love to finger paint but I hate cleaning up the mess and my 2 year old ends up getting everywhere. I am going to try this the 1st chance I get!!!
ReplyDeleteI'm a Nanny now so this is my second generation of finger painters. I've always used the inside door of our dishwasher for a table. The kids just sit on the floor and paint on their papers. After they finished I Just close and turn on. Easy clean up. :)
ReplyDeleteNanny Bif
I just wrote about your little project on my blog (linking to you of course!) You can check it out at:
ReplyDeletehttp://cobwebscupcakesandcrayons.com/2012/08/27/mess-free-finger-painting/
Thanks for the great idea!!
Kelly
Cobwebs, Cupcakes and Crayons
That's a cool idea.
ReplyDeleteI have also tried this with my daughter allowing her to use a Q-tip as her "brush" since sometimes her finger sticks to the bag.
ReplyDeleteI LOVE YOU! lol this is such a good idea, why didn't I think of this?
ReplyDeleteSo there is 3 seperate bags taped on top of each other? Ie one blue one yellow one red?
ReplyDeleteThere is one bag with red and yellow, taped to the table. Beside it there is a second bag with yellow and blue, taped to the table. Beside that one, there is a third bag with red and blue, taped to the table.
DeleteThis is such a great idea for my daycare!! I have a few little ones that love to paint but hate it on their hands and I have a few that love it on their hands and everywhere else their little hands can touch!! Love this mess-free idea for inside art time.
ReplyDeleteI stumbled across your post via pinterest and wrote about our experience here http://www.gratefullynourished.com/gratefully-nourished/2012/9/22/paint-in-a-bag.html
ReplyDeleteWe had a great time (although I didn't read your post until after we tried it). Thank you for a great activity.
Love this idea, and definitely going to try it with the kiddos. I do despise the mess of finger paints. Since I'm stealing one of your ideas to do with my kids, I thought I'd give you one of mine. It's another fun, finger painting project: http://testingtrendy123.blogspot.com/2012/09/easy-peasy-finger-painting-project.html
ReplyDeleteI just love this project! I'll be linking to it tomorrow on my blog: http://thehomemadeoasis.blogspot.com/
ReplyDeleteThanks for the great idea - my daughter loved it!!
ReplyDeletethis is fabulous!!! Thank u for such wonderful ideas
ReplyDeleteYou got FANS!!!!
ReplyDeleteMy little 2 year old girl loves painting and love coloring....but she did not like this activity at all. Weird I know...but it wasn't "exciting" enough for her. She kept saying "i want to touch the paints...open it" and then she wanted to be done after just a few minutes when there was no mess to be made. Gotta love 2 year olds! I won't do this one again.
ReplyDeleteMy kids love painting, but we do not do it as often as they would like because of the mess. This is a great idea!!! Thank you for sharing. I would love for you to share this idea on my linky party, my readers will love this idea! http://www.fivelittlechefs.com/2013/01/fantastic-thursday-27.html
ReplyDeleteThis sounds amazing, I am an ECE student and work with many three year olds who are working on their colours, I haven't seen them painting. However, the developmental levels of the children might be a different story, I am not sure if this would be interesting for them or better suited for toddlers. And in a HighScope center, I might add a small bin of Qtips to draw with.
ReplyDeleteThis really is a brilliant idea, thank you!!!!!!!
ReplyDeleteI did this with my 4 year old recently and he loved it! It was a fun activity that he could come back to several times throughout the day :). I blogged about it and linked to you here.
ReplyDeleteThanks for the great suggestion!
Working with autism children , this is awesome idea. Some don't Ike the feel of paint so this might just work. Will try it soon . Thanks for sharing.
ReplyDeleteDid you have the paper in the bag with the paint so the kids have something to show or was th paper under the bag and the paint in the bag I tried this with my kids 2day and couldn't get the paper out of the bag with out it riping, and couldn't get another price in either thanks confused :§
ReplyDeleteThe paper was under the bag, there solely for contrast so the colours could be seen better. This was more of a sensory activity than a finished-product activity; they had fun with it even with nothing to show for it afterwards. :) Sorry I wasn't more clear!
DeleteHi, Thought I'd share two things I have found. The heat sealing bag are thicker for us though the underside is a bit textured. For my 20 month old I refused to do the sensory bags though I knew she would love them because of the hair gel. When baking one day I stumbled on the solution that works for us... I fill a heat seal bag (could use freezer bag) with the sensory items and light corn syrup (the clear one)!!! Sometimes I add food coloring but usually I add a different colored glitter per bag. That way when she gets a hole in the bag even if she eats some (or the dog does lol) they just get corn syrup not hair get. :-) Just wanted to share this additional option with you. Best of luck and thanks for sharing your blog!!
ReplyDeleteGreat idea!
DeleteThank you! This is a great idea!
ReplyDeleteIt's an especially good way to support art exploration for kids with sensory aversions. I shared this with our families who have kids with special needs :)
Kids Uncomplicated
https://www.facebook.com/KidsUncomplicated
BUT BUT BUT :( how do i do this and keep the fainting they created :(
ReplyDeleteThis was more of a sensory activity than a finished-product activity; they had fun with it even with nothing to show for it afterwards. :) But I believe someone up higher in the comments had success keeping the painting by using a thick sheet of paper (cardstock) in the bag and then pulling it out and hanging it up to dry.
DeleteLove how these turned out! My daughter and I did something similar but with a lot less paint and a piece of paper instead. Gonna have to try this one out though! I featured your idea on my blog post: http://www.needlesandbows.com/2013/10/mess-free-finger-painting/
ReplyDeleteThis was the perfect activity for being stuck in the house due to Snowpocalypse 2014. Despite having been given lots of opportunities to get use to it, my son just doesn't care for getting his hands dirty. Plus he's really into art. This activity really got his attention and we pretended it was the ocean and played with it for over an hour. Thank you for sharing!
ReplyDeleteThis didn't work at all for us, the paint didn't move away enough to show the finger marks through the paint, I could do it with the back of my nail but not my finger so no good for the kids - I don't know why ours didn't work like yours!??
ReplyDeleteMaybe too much paint in the bag?
DeleteI think I need some sensory therapy for myself! Paper first, then unzipped Ziploc bags filled with paint, then painter's tape. How does this keep my student's tiny, little fingers paint-free? I know I'm assembling it incorrectly. What am I missing?
ReplyDeleteOnce the paint is in the bags, close the bags and tape them to the table. The paper underneath is optional; it just provides better contrast. Then the kids use their fingers to push around the paint that is inside the bag - mix the colours, make pictures, write words, etc. There's no final product that is produced from this activity. It would be better referred to as a sensory bag than as finger painting.
DeleteWhat a great idea! I will definitely try this with my busy 4yo boy at home.
ReplyDeleteSuch a wonderful idea! I'm new to homeschooling and love finding neat, mess-free ideas for craft/art time. I think this would be a great activity for all ages and maybe even for myself!! =) Thanks for sharing!
ReplyDeleteI have had this pinned forever. Perhaps today is the day! :)
ReplyDeletewww.strollersavvy.com
Oh my goodness...you are a life savior. My son loves to paint, but he flips his hands all over when he gets excited and I have found everything imaginable on the floor, ceiling and everywhere in between when we have a fun activity lined up. I think I will print something on the paper, like fall leaves or a jack o lantern, for him and let him "paint" them!!
ReplyDeleteThanks for the activity idea! I just did this with my three year old for our activity time today. However, I had an issue with not really being able see the 'painting' that we did. The bag was covered in paint on the inside and the marks we made disappeared very quickly, if they appeared at all. Do you have any suggestions for how I could fix that problem?
ReplyDeleteWe had that problem at first as well. Try using less paint in the bag, and/or ensure that as much of the air is out of the bag as possible. That seemed to fix it for us. :)
DeleteWhat an awesome idea! Love this :)
ReplyDeleteLOVE this! Will have to try it with my wonderful granddaughter! Especially the ideas about the hair gel and glitter! When I want to let her make a mess... I get several large quantities of finger paints (home made or store bought) and let her dump them all out on the driveway and in her swim suit or play shorts, I let her HAVE AT IT painting my driveway... making footprints, hand prints, murals...everything! Then when it dries, I have a beautiful driveway for a few days before it wears off and she is PROUD of her creation and LOVES to clean up in the hose before coming in!
ReplyDeleteWhat an excellent idea, Janie! That sounds like so much fun. My kids would love that. :)
DeleteI absolutely love this idea! I want to do it with my little brothers. Thank you :)
ReplyDeleteI have a quick question. I want to try this with my Library Storytime group (they are toddlers) for the last session.My idea is to put flat canvas that has their initial taped on the canvas. Then add the paint, close the bag and tape it down.Then let the kids go crazy. After I would remove the canvas (probably by cutting through the baggie) and they can take their masterpiece home. Do you think this would work? Thanks!!
ReplyDeleteI haven't tried that myself, but I think it should work! Let us know how it turns out!
Delete